In this tutorial you will learn How to send something to the back on Google Slides.
To send soemthing to the back on Google Slides ,Select the element or image ,Right Click on it and Choose Order from the drop-down.Now Unde Order Select “Send to back“.
How to Send Something to the back on Google Slides : Step by Step Guide
Before sending an image to the back on Google Sheets.One should know How to insert an image in Google Slides .Follow the below steps to insert an image in Google Slides
How to insert an Image in Google Slides
Enclosed are the steps to insert an image in Google Slides
Step 1 : Open Google Slides
Open Google slide presentation where you need to insert an image .
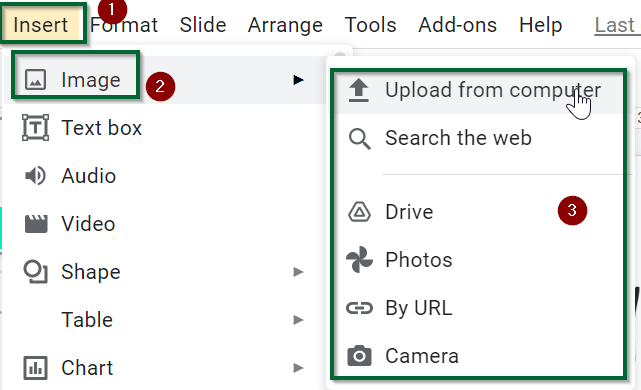
Step 2 : Click on the Insert menu and Choose Image
- Click on the Insert menu on the Main menu bar .
- Now from the drop-down Choose Image
Step 3 : Select and Upload the Image
- Once you click on Image ,you will get the options to upload the image .
- You can upload the image from you local computer or by searching the web.
- You also have the option to Upload the image from Google drive or Google Photos or by using Direct image url and Camera .
Send Something to the back on Google Slides(Image/Photos)
Enclosed are the steps to send something to the back on Google Slides.
Step 1 : Select the Image on Google Slide that you need to Edit.
- Simply Click on the image that you need to send it to the back .
- Once the image is selected you will see a blue outline around the corners of the image.

Step 2 : Right Click on the image and Choose order
Right Click anywhere on the image and Choose “Order” from the drop-down

Step 3 : Under Order Choose “Send to Back”
You will get the below four options under Order :
- Bring to front
- Bring forward
- Send Backwards
- Send to Back
As we need to send the image to the back ,we need to select “Send to Back” from the available options.

Step 4 : Adjust the image postion as per your requirement
In the below example you will see the image is sent to back and the text Welcome appears in front.
You can adjust the size and postion of your image as per your requirement using the corners of the image and dragging it with mouse cursor

How to Send Something to the back on Google Slides(Conclusion)
In the above tutorial we have shown you how you can insert an image and send it back in Google Slides .
We hope this tutorial on How to Send Something to the back on Google Slides was useful.
Related articles :
How To Insert Google Sheets Into Google Slides ( Easy Guide )
How to add slides in Google Slides ( Easy Guide )
